前言
遇到的问题
手动服务配置前置(按顺序开始)
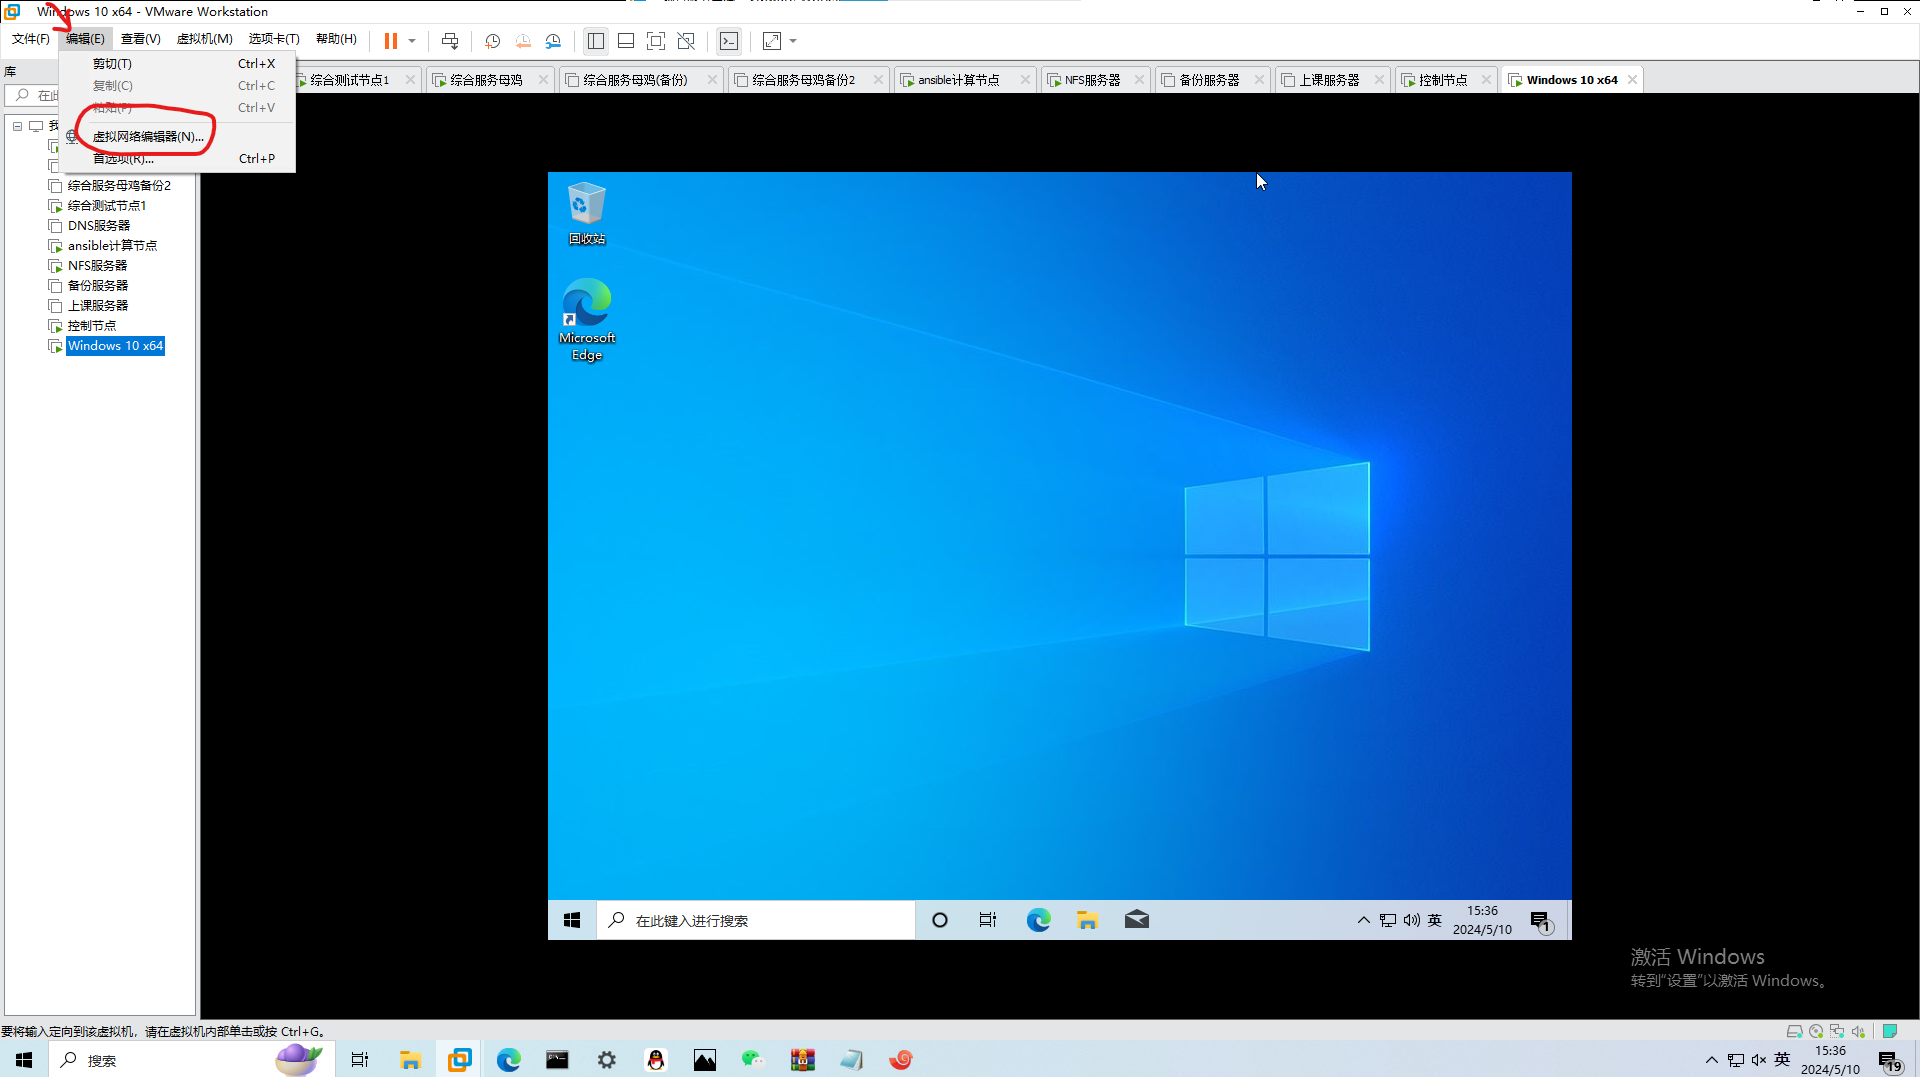
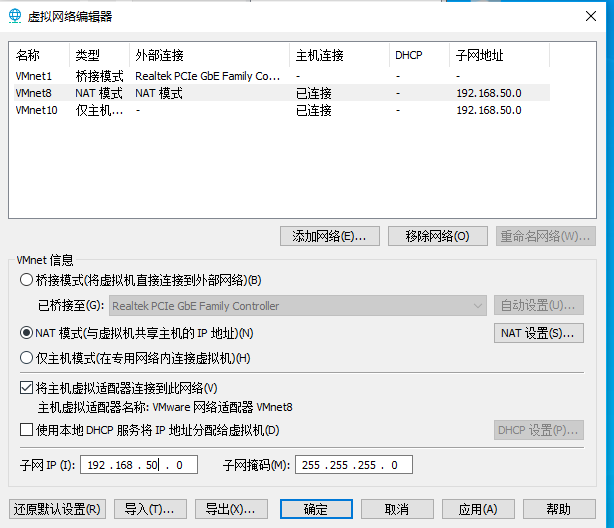
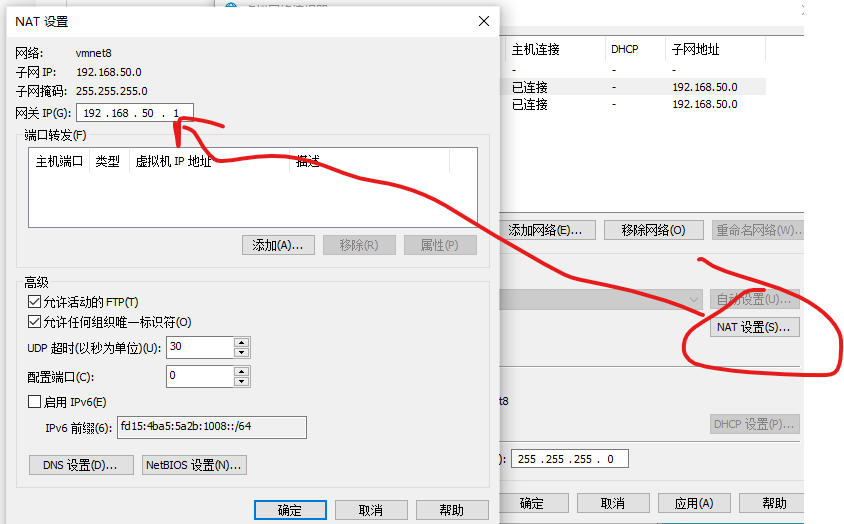
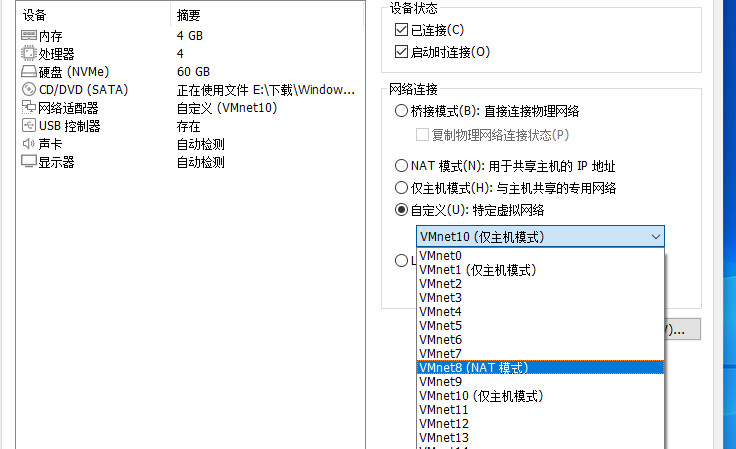
0(vmware用户前置配置)

0.5 最小化用户安装配置
如果想让你用的爽点,最小化用户就必须得做的操作
镜像肯定是要挂载的,执行下面命令先挂载
1
| mount -t iso9660 /dev/sr0 /mnt
|
然后跳转到2去找本地源,再就是只能用vi编辑
然后配置好源后,安装tab自动补全和ifconfig命令查看网卡
1
| yum install net-tools -y && yum install bash* -y && yum install vim -y
|
1 静态IP配置
查看网卡(ens160就是网卡型号)
1
2
3
4
5
6
7
8
| ifconfig -a
#ens160: flags=4163<UP,BROADCAST,RUNNING,MULTICAST> mtu 1500
# inet6 fe80::20c:29ff:fea5:d8fb prefixlen 64 scopeid 0x20<link>
# ether 00:0c:29:a5:d8:fb txqueuelen 1000 (Ethernet)
# RX packets 171783 bytes 191870187 (182.9 MiB)
# RX errors 0 dropped 0 overruns 0 frame 0
# TX packets 25077 bytes 2147309 (2.0 MiB)
# TX errors 0 dropped 0 overruns 0 carrier 0 collisions 0
|
1
| vim /etc/NetworkManager/system-connections/ens160.mconnect.mconnection
|
配置下方的配置(仅需修改ipv4即可)
1
2
3
4
5
| [ipv4]
address1=192.168.50.2/24,192.168.50.1
dns=223.5.5.5
ignore-auto-dns=true
method=manual
|
2 配置yum源
网络源
1
| vim /etc/yun.repos.d/aliyun.repo
|
配置内容
1
2
3
4
5
6
7
8
9
| [ali_BaseOS]
name=ali_BaseOS
baseurl=https://mirrors.aliyun.com/centos-stream/9-stream/BaseOS/x86_64/os/
gpgcheck=0
[ali_AppStream]
name=ali_AppStream
baseurl=https://mirrors.aliyun.com/centos-stream/9-stream/AppStream/x86_64/os/
gpgcheck=0
|
本地源
1
2
3
4
5
6
7
8
9
| [local_BaseOS]
name=local_BaseOS
baseurl=file:///iso/BaseOS/
gpgcheck=0
[local_AppStream]
name=ali_AppStream
baseurl=file:///iso/AppStream/
gpgcheck=0
|
永久挂载
添加内容
1
| /dev/sr0 /iso iso9660 defaults,user,ro 0 0
|
立即生效
#自动脚本配置(带署名化)
可能有些脚本不符合某些人的需求(毕竟我用我的作者名来创建文件以及内容)
完全原创,可以给我修改建议或把修改好的版本提交给我
同时,ansible也有延迟替换ip方案
1
2
3
4
5
6
7
8
9
10
11
12
13
14
15
16
17
18
19
20
21
22
23
24
25
26
27
28
29
30
31
32
33
34
35
36
37
38
39
40
41
42
43
44
45
46
47
48
49
50
51
52
53
54
55
56
57
58
59
60
61
62
63
64
| #!/bin/bash
# echo "anisable专供延迟"
# sleep $[ ( $RANDOM % 60 + 5 ) ]
namedeta="nuoyis"
echo "正在修改网卡,有短暂断网现象"
nuo_setnetwork_shell=$(ifconfig -a | grep -o '^\w*' | grep -v 'lo')
nmcli connection delete $nuo_setnetwork_shell
nmcli connection add con-name $nuo_setnetwork_shell ifname $nuo_setnetwork_shell type ethernet autoconnect yes
for i in {3..254};
do
ip=192.168.60.$i
ping -c 2 $ip > /dev/null 2>&1
if [ $? -eq 1 ]; then
nuoautoip=$ip
break
fi
done
nmcli connection modify $nuo_setnetwork_shell ipv4.method man ipv4.addresses ${nuoautoip}/24 ipv4.gateway 192.168.60.2 ipv4.dns 192.168.60.2
nmcli connection up $nuo_setnetwork_shell
nmcli connection reload
systemctl stop NetworkManager
systemctl start NetworkManager
namedeta="nuoyis"
echo "配置镜像源,默认1是本地源,2是网络源"
read -p "请输入你的序号:" yumid
touch /etc/yum.repos.d/$namedeta.repo
if [$yumid = 1];then
cat > /etc/yum.repos.d/$namedeta.repo << EOF
[${namedeta}_BaseOS]
name = ${namedeta}_BaseOS
baseurl = file:///mnt/BaseOS
gpgcheck = 0
[${namedeta}_AppStream]
name = ${namedeta}_AppStream
baseurl = file:///mnt/AppStream
gpgcheck = 0
EOF
cat >> /etc/fstab << EOF
/dev/sr0 /mnt iso9660 defaults,user,ro 0 0
EOF
mount -a
else
cat > /etc/yum.repos.d/$namedeta.repo << EOF
[${namedeta}_BaseOS]
name = ${namedeta}_BaseOS
baseurl = https://mirrors.tuna.tsinghua.edu.cn/centos-stream/9-stream/BaseOS/x86_64/os/
gpgcheck = 0
[${namedeta}_AppStream]
name = ${namedeta}_AppStream
baseurl = https://mirrors.tuna.tsinghua.edu.cn/centos-stream/9-stream/AppStream/x86_64/os/
gpgcheck = 0
[${namedeta}_epel]
name=${namedeta}_epal
baseurl=https://mirrors.tuna.tsinghua.edu.cn/epel/9/Everything/x86_64/
gpgcheck = 0
EOF
fi
yum update -y && yum makecache -y
|
服务搭建
注意
如果你不在公网上访问或者不在各大赛项搭建以下服务,才能执行下方命令区域,否则请看安全部分
(1)如果服务无法ping通或者无法访问,多半是防火墙,这里操作是关闭并禁止开机自启
1
2
| sudo systemctl disable firewall
sudo systemctl stop firewall
|
(2)如果文件不让读写,或者服务的配置文件无法使用,查看selinux为宽松或者关闭
1
2
3
4
| setenforce 0
或者
sudo vi /etc/selinux/config
SELINUX=disabled
|
FTP服务
1
2
3
4
| yum install vsftpd -y
systemctl start
systemctl enable
vim /etc/vsftpd/vsftpd.conf
|
1
2
3
4
5
6
7
8
9
10
11
12
13
14
15
16
17
18
19
20
21
22
23
24
25
26
27
28
29
30
31
32
33
34
35
36
| # 不以独立模式运行
listen=NO
# 支持 IPV6,如不开启 IPV4 也无法登录
listen_ipv6=YES
# 匿名用户登录
anonymous_enable=YES
no_anon_password=YES
# 允许匿名用户上传文件
anon_upload_enable=YES
# 允许匿名用户新建文件夹
anon_mkdir_write_enable=YES
# 匿名用户删除文件和重命名文件
anon_other_write_enable=YES
# 匿名用户的掩码(022 的实际权限为 666-022=644)
anon_umask=022
anon_root=/ftp/anon
# 系统用户登录
local_enable=YES
local_umask=022
local_root=/madia/ftp/user
chroot_local_user=YES
allow_writeable_chroot=YES
chroot_list_enable=YES
chroot_list_file=/etc/vsftpd/chroot_list
# 对文件具有写权限,否则无法上传
write_enable=YES
max_clients=0
max_per_ip=0
# 使用主机时间
use_localtime=YES
pam_service_name=vsftpd
|
Apache服务
1
2
3
4
| yum install httpd -y
systemctl start httpd
systemctl enable httpd
vim /etc/httpd/conf/httpd.conf
|
配置文件
1
2
3
4
5
6
7
8
9
10
11
12
13
14
15
16
17
18
19
20
21
22
23
24
25
26
27
28
29
30
31
32
33
34
35
36
37
38
39
40
41
42
43
44
45
46
47
48
49
50
51
52
| ServerRoot "/etc/httpd"
Listen 80
Listen 8080
Include conf.modules.d/*.conf
User apache
Group apache
ServerAdmin root@localhost
<Directory />
AllowOverride none
Require all denied
</Directory>
DocumentRoot "/var/www/html"
<Directory "/var/www">
AllowOverride None
Require all granted
</Directory>
LogFormat "%h %l %u %t \"%r\" %>s %b \"%{Referer}i\" \"%{User-Agent}i\" %I %O" combinedio
</IfModule>
CustomLog "logs/access_log" combined
</IfModule>
<IfModule alias_module>
ScriptAlias /cgi-bin/ "/var/www/cgi-bin/"
</IfModule>
<Directory "/var/www/cgi-bin">
AllowOverride None
Options None
Require all granted
</Directory>
<IfModule mime_module>
TypesConfig /etc/mime.types
AddType application/x-compress .Z
AddType application/x-gzip .gz .tgz
AddType text/html .shtml
AddOutputFilter INCLUDES .shtml
</IfModule>
AddDefaultCharset UTF-8
<IfModule mime_magic_module>
MIMEMagicFile conf/magic
</IfModule>
EnableSendfile on
IncludeOptional conf.d/*.conf
<VirtualHost *:80>
ServerName 0.0.0.0
DocumentRoot /var/www/nuoyis
</VirtualHost>
|
SAMBA服务
1
2
3
4
| yum install samba* -y
systemctl start smb
systemctl enable smb
vim /etc/samba/smb.conf
|
底部增加
1
2
3
4
5
6
| [nuoyis]
comment = xxxx samba share
path = /media/nuoyis/
writable = yes
browseable = yes
guest ok = yes
|
然后再增加用户
1
2
3
| useradd nuoyis1024
passwd nuoyis1024
smbpasswd -a nuoyis1024
|
NFS服务
1
2
3
4
5
6
7
8
9
10
11
12
13
14
15
16
| yum install rpcbind -y
systemctl start rpcbind
systemctl enable rpcbind
NFS的配置文件为 /etc/exports,文件内容默认为空。在设置共享资源时,格式为:
目录位置 客户机地址(权限选项)
(1) 例如,若要将文件夹/opt/web 共享给192.168.100.120主机使用,允许读操作:
[root@localhost ~]# vi /etc/exports
/opt/web 192.168.100.120(ro) //ro表示只读权限
(2) 若要将同一个目录给两个不同的主机,且分配不同的权限时,只要以空格分隔指定多个“客户机(权限选项)”即可。
例如,若要将/var/ftp/pubilc 目录共享给两个客户机,分别给予只读、读写权限:
[root@localhost ~]# vi /etc/exports
/var/ftp/pub 192.168.1.54(ro) 192.168.1.77(rw) //rw表示读写权限
重启NFS,注意:手动加载NFS共享服务时,应该先启动rpcbind,然后再启动nfs。
showmount -e //查看本机共享文件目录
|
DHCP服务
1
2
3
4
| yum install dhcpd -y
systemctl start dhcpd
systemctl enable dhcpd
vim /etc/dhcp/dhcpd.conf
|
DHCP配置最快搭建方案
1
| cp /usr/share/doc/dhcp-server/dhcpd.conf.example /etc/dhcp/dhcpd.conf
|
你需要的服务
1
2
3
4
5
6
7
8
9
10
11
12
13
14
15
16
| # 动态配置
# 分别是网段范围,分配的ip范围,网关,广播地址,域名解析,更新时间
subnet 192.168.50.0 netmask 255.255.255.0 {
range 192.168.50.11 192.168.50.250;
option routers 192.168.50.1;
option broadcast-address 192.168.50.255;
option domain-name-servers 192.168.50.1;
default-lease-time 600;
max-lease-time 7200;
}
# 静态解析,以web服务器为例
host www {
hardware ethernet 网卡mac;
fixed-address 192.168.100.80;
}
|
DNS服务
1
2
3
4
| yum install bind -y
systemctl start bind
systemctl enable bind
vim /etc/named.conf
|
如果仅需对内网机提供服务,把127.0.0.1和localhost改成any就行
如果需要域名内网配置的话
客户端配置
[root@DNS-user /]# cat /etc/resolv.conf
Generated by NetworkManager
search localdomain
nameserver 192.168.50.1
Mariadb服务
1
2
3
| yum install Mariadb -y
systemctl start Mariadb
systemctl enable Mariadb
|
Firewalld规则
firewall-cmd –zone=public –add-service=服务名 –per
SeLinux策略
查看相应SeLinux策略方面
getsebool -a | grep 服务名
Ansible基本操作
1
2
3
| yum install Ansible -y
systemctl start Ansible
systemctl enable Ansible
|
Docker服务
###万能脚本
1
| curl -fsSL get.docker.com -o get-docker.sh
|
###手动执行首先运行
1
| yum install docker-ce -y
|
如果出现未找到软件包先执行以下指令
1
2
3
4
| yum install -y yum-utils device-mapper-persistent-data lvm2
yum-config-manager --add-repo https://download.docker.com/linux/centos/docker-ce.repo
sed -i 's+download.docker.com+mirrors.tuna.tsinghua.edu.cn/docker-ce+' /etc/yum.repos.d/docker-ce.repo
yum makecache
|
由诺依阁提供Hexo转Typecho软件支持